
Translated material
Parsing with Python. Lesson 2


Parsing with Python. Lesson 2
Learning to scrape websites using the Selenium library
We continue to study parsing with Python. Last time we used the Requests and Beautifulsoup libraries - but you can’t always get by with them alone. Today we'll talk about the Selenium library.
With its help, we can simulate user actions in the browser - that is, the site will actually open on the computer, and then the script will perform the actions we have prescribed.
In the first lesson on parsing, we worked with the KinoPoisk website and its list of top 250 films. It was quite simple: when moving from page to page, the link changed predictably, and we were able to write this condition in the code. But there are sites where everything works differently.
For example, a register with information about state municipal institutions . Let's try to find oncology clinics there and see what the link looks like.

The screenshot shows that after our request the link did not change. It will not change when we move to the next page. It is precisely for such cases that the Selenium library comes in handy - the script itself will enter the desired query into the search bar, click “Show”, start collecting the data we need, and so on.
To use this library, you need to download ChromeDriver for your version of the Chrome browser (if the versions do not match, your code will not work). Unzip the chromedriver file; for convenience, you can put it in the root directory or on your desktop.
Next, we’ll install the library itself using Jupyter using pip install .

Now we import from Selenium all the commands and functions we need. We will also need the Beautifulsoup , sleep and tqdm libraries today - we’ll import them too.
 The tqdm library is needed so that Jupyter displays a bar that fills as the main script progresses
The next steps will be similar to what we did in the last tutorial , but the library will have a different syntax. First, let's launch our ChromeDriver, on macOS this is done like this: create a browser variable, specify the Chrome command and write the path to the previously unpacked ChromeDriver in quotes.

After executing the command, the browser itself will open.

Now we can control the browser using commands. To get to the site, we will create a url variable and indicate the desired site (in our example: https://bus.gov.ru/registry ). By analogy with Requests , we will use the get method and pass this variable to the input.

The site should load in our Chrome. Let's fill in the search criterion - to do this, as last time, we will examine the HTML code of the page using the “View Code” function (it is better to do this in a regular browser, and not in a managed Selenium one ).

As you can see in the developer panel, everything here is quite nice and clear, the tag and class look unique. But at the same time, it is worth remembering the Beautifulsoup feature, which is also in Selenium - if you specify a request for some element, the request will always select the first element from the code.
Therefore, first we will find this tag on the page using the command from the find group. If you press Tab on your keyboard after typing find , several search options will appear to choose from: by class name, by CSS selector, by id , and so on.

We need a tag_name , specifically input .
 The entire page is now a Selenium object
The message, as in the screenshot above, shows that so far we have done everything correctly - the object was found by the browser. We can also try searching by class_name . But be careful: if there are spaces inside the class name in the HTML code, then these are actually several different names. Therefore, if you copy the entire thing, Selenium will throw an error.

For example, let's take the first element class ( search-input ) and again get the response from Selenium . There are still ways to find the element you need. For example, right-click on the desired piece of code and select Copy XPath from the Copy context menu.
 XPath is the direct path to an element in the site tree
Let's use the find command again, but choose xpath search.

By analogy, in the Copy context menu you can select Copy selector - then accordingly change the criterion in find to css_selector .
In the same way, you can search for links by text on a page. In the header you can see, for example, the clickable text “Results of an independent assessment.” The criteria for the find command in this case would be link_text . To pull out the link itself, add the get command to the href attribute.

Let's return to the input field. Let's select one of our search functions and name this variable input_tab . Let's add our search request to it using the send_keys function and check whether the request was executed in the browser window controlled by ChromeDriver.

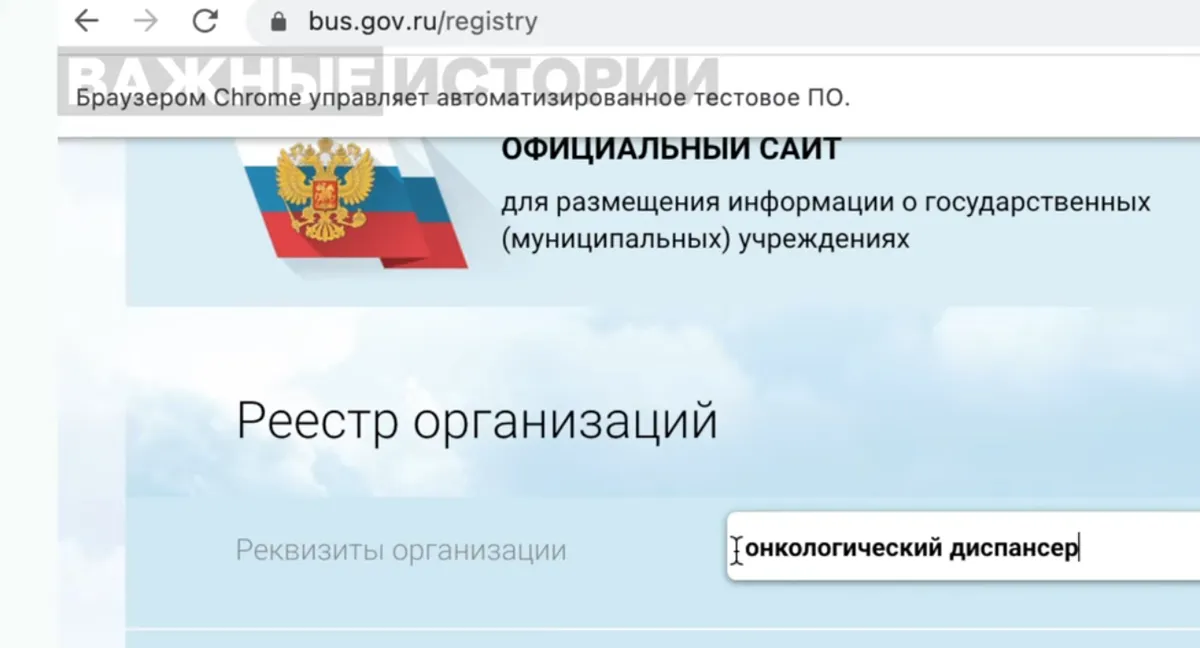
The next step is to click on the “Show” button. Let's look at its code.

A button has a button tag and several classes. More often than not (and in our example too) we shouldn’t hope that we will simply call the button tag, and it will turn out to be exactly the button we need. It's better to pull out the specific XPath of the element yourself.
To do this, we will use the already familiar find_element_by_xpath command, write down the name of the tag in which we want to find the desired XPath , and in square brackets through @ we will add an attribute by which we will refine the request. In our case, the most successful attribute is type and its appropriate value, submit .
 Pay attention to the syntax and especially the quotes: first single, then double
Let's call this variable button , and the next step is to simply click on it with the click command.

The browser should display results for the previously entered request.
By the way, in this case it was possible not to search for the button, but using the send_keys command to simulate pressing Enter on the keyboard to start the search. This way you can simulate pressing any keys or their combinations.

Now that we have a sorted database, we can start parsing it. For example, let's try to get links to the registration data of each company and make a table from these links and the names of the corresponding companies.
Let’s draw out the title according to the already familiar pattern: click on “View code” and find the tag ( a ) and class ( result__title ). Next we will use two libraries at once, Selenium and Beautifulsoup . The page code that we read using Selenium is passed to Beautifulsoup via the browser.page_source command. Now, if we call this command, we will see the entire page code.
 We used to get the code using r.text
Using Beautifulsoup and the find command, we will find the a tag and the result__title class, immediately converting the result into text and removing extra whitespace characters (with the strip command). Let's call the variable name .

The next step is a link to registration data. Click on “View Code” again and find the tag and class. There are several classes indicated, let's take only the second one, because it looks unique for this element.

We create a link variable, enter the necessary tag and class, and request the href with the get command. Let's add the domain at the beginning to get the entire link.

We have dealt with the first element from the search results list. But we need to go through everything, and don’t forget about the next pages. Let's see which tags contain all our data.
 In our case, this is a div tag with the result class
You can walk through the cards using either Beautifulsoup or Selenium . First, let's do it as we already did in the previous lesson . Let's enter the findAll command to find all the necessary divs with the result class. Let's check using len how many there are on the page. It should be 10 .

If you do the same thing through Selenium , you need to use the browser variable, the find_elements_by_class_name command (note that elements is now plural, not singular, as we wrote earlier today) and the class name result . To be sure, you can double-check the length of the list again.

Let's collect all the necessary commands in one cell to make it easier to work with them. We will put the organizations that we collect from the site page into the orgs variable.

Let's create a cycle. For each organization, we will first get the name, then the link. In the loop, don't forget to replace soup with org . Let's add a data variable to the beginning of the cell, where we will write all the results.
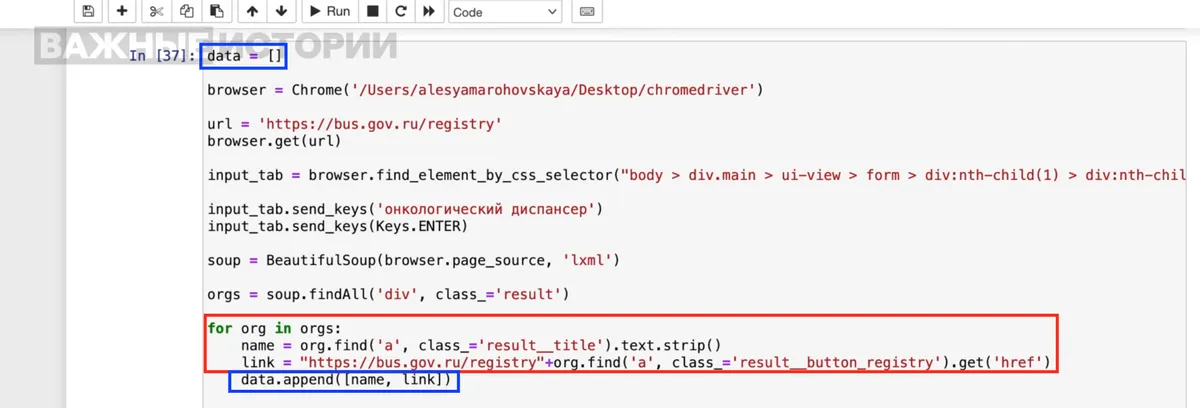
Now let's run the code. But it will return us an error.

The fact is that Selenium is designed in such a way that until the entire page is loaded, the Beautifulsoup functions will not be able to find anything. The sleep library will help us here - we’ll make a short delay between the search request and directly collecting data from the page.
 At the end we added print(len(data)) to check the functionality of the code. 10 were printed, which means the script went through all the cards
Let's request the content of data - and we will see that this time everything worked out.

All that remains is to add auto transitions between pages. Let's check the code of the "Next" button to add this command to the loop.
 Very convenient class
In our case there are 9 pages, which means you need to click on the “Next” button 9 times and collect the data. Let's use, as in the last lesson, the loop for p in range 10 (1 more than needed). Let's ask the script to print not only the number of cards collected, but also the page completed.
Let's add the find command using the class name pagination_next and click directly. After the transition, we will add a delay using sleep so that the data has time to load.
 It is better to set the delay around 10 seconds
Now we can query the content data again to get all the names of organizations and links that the site displays at our request. After that, you can save them into a table, as we did last time , and work with them further.
Still have questions? Ask them in our Telegram chat , we will try to answer.
Support thosewho is telling the truth! You can become our donor by making a one-time or monthly donation. We want to depend only on you - those who want to know the truth, those who are not afraid to be free. Help us tell you the Stories That Matter.Support Important Stories