
Translated material
Parsing with Python. Lesson 3


Parsing with Python. Lesson 3
Learning to scrape websites using the Scrapy library
We continue to study parsing with Python. Last time we used the Requests , Beautifulsoup and Selenium libraries. Today we'll talk about the Scrapy library. It allows you to quickly collect information from sites, work with dynamic sites when information is loaded automatically, and work with API. Using the example of a bookstore, we will try to figure out how this library works.
It is more convenient to work with Scrapy in the Visual Studio Code editor. If you don’t yet know how to work in VStudio and install a virtual environment, watch the lessons where we showed how to write a robot for analyzing government contracts. In them, we described in detail how to install the editor, analyzed basic commands in the terminal, and learned how to install and launch a virtual environment.
We will start this lesson from the moment when VStudio and the virtual environment are installed.
Create a project
In the editor we open a terminal. Using the terminal, we will create a folder where our project will be located, let's call it our_spider. Command: mk dir our_spider.
Let's go to this folder: cd our_spider.
And launch the virtual environment: pipenv shell

Now install the library: pip install scrapy

To make it easier to look at the commands we enter, we can sometimes clear the terminal. There are hotkeys for this on Mac: control+L.
Let's create our first project, let's call it bestsellers. To do this, enter the command: scrapy startproject bestsellers.
Let's go to the folder: cd bestsellers.
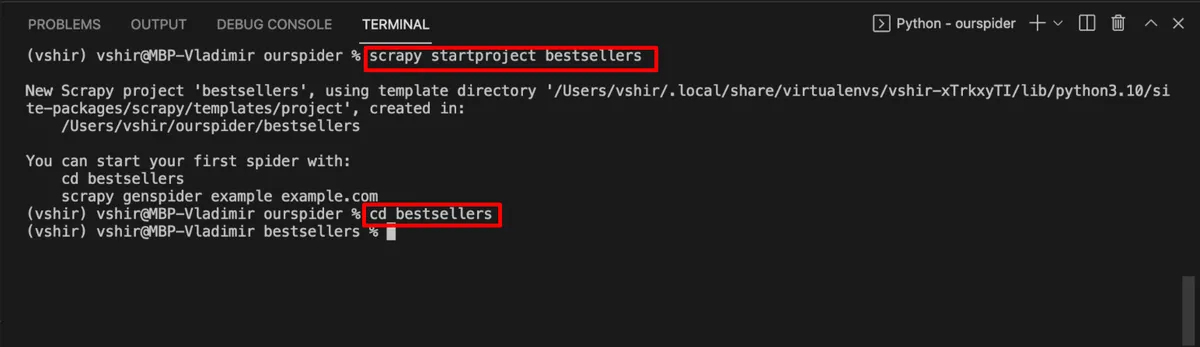
Let's open this folder in the editor: open folder → our_spider.

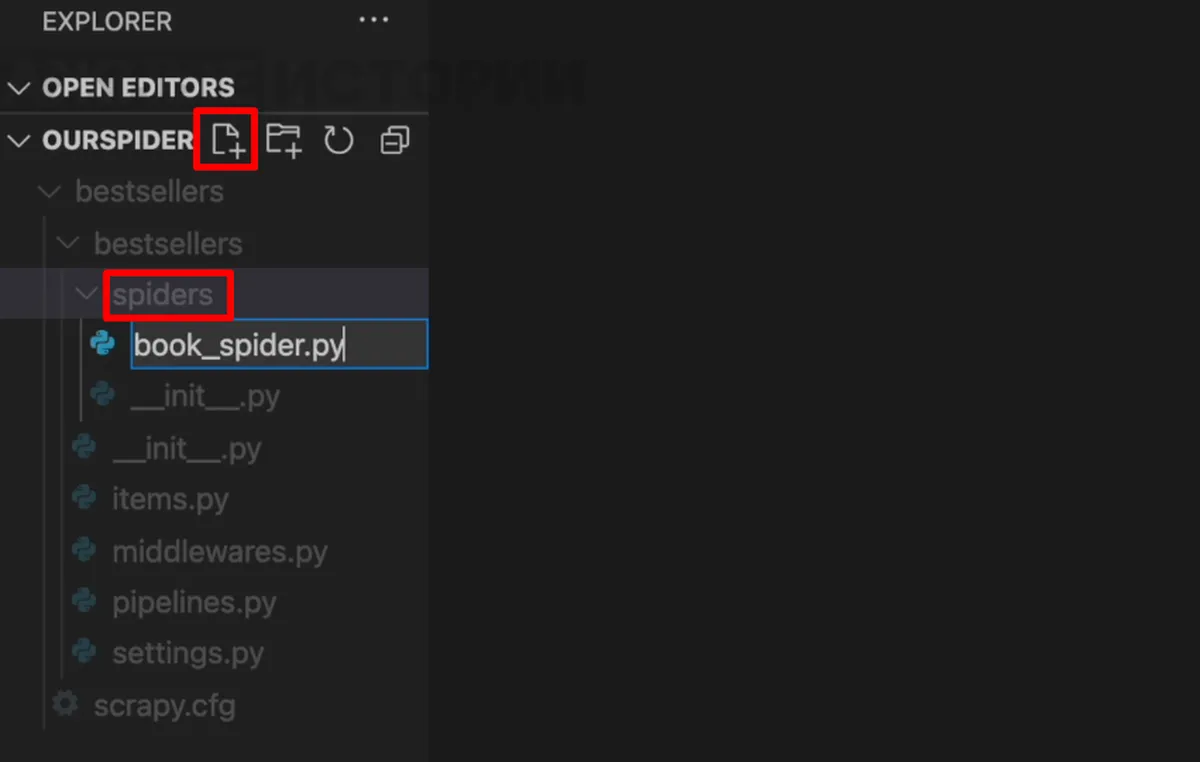
We see that several folders and files have appeared in the project folder. These are configuration files, settings for our scraper. More information about what is contained in each file is written in the official Scrapy documentation . But now we are not interested in these files. We go to the spiders folder. It will contain spiders - these are files in which we specify what exactly needs to be collected on the site. Let's create the first spider. To do this, click on the folder icon next to the name of the main folder - bestsellers. Let's call our spider book_spider.py. Don't forget to specify the .py extension for Python.
Studying the site
Let's look at the site we will be working with. This is the Book24 online store. We will collect information about books from the bestsellers section. To do this, you need to go to the page of each book, collect the necessary information, exit and go to the page of the next book. And so go through all the books in the section.
Before we start writing code, let's see which commands will get the elements we need. To do this, let's go to the scrapy shell. Scrapy shell is a shell, sort of like a private room, in which you can try to access a site using individual commands and see what responses are returned. You don't need to write a whole code.
To go to the scrapy shell, type the scrapy shell command in the terminal and press enter.

Now let's turn to the site with which we will work. To do this, we will use the fetch command. In parentheses and quotation marks we will provide a link to the book page . In the response we saw the number 200. This means the site is working and is ready to give us information.

To access the site, we will use the response command. We can access elements through a css element or xpath. We have already talked about this in previous lessons. Let's try to access the CSS element.
Book title
Let's see where the title of our book lies. To do this, right-click on the name and select “view code”. Developer Items will open. The title of the book is in the h1 tag with the product-detail-page__title class. Let's copy it.

In the terminal, type response.css('h1.product-detail-page__title'). Press enter. We got the entire css selector.

It's hard to make out anything in this recording. To make it easier to understand what we got, after the class name we write two colons and the word text: response.css('h1.product-detail-page__title::text'). In order not to rewrite the command in the terminal from scratch each time, you can call the last command using hot keys: on a Mac it’s the up arrow.

We received a line that contains the header we need. To get it, we add it to the end of the get command; it outputs the first element from the list of css selectors: response.css('h1.product-detail-page__title::text').get(). We got the header we needed.

To get rid of spaces on the sides, we will use the strip method we already know: response.css('h1.product-detail-page__title::text').get().strip()

This command can be copied into a text document. We will still need it.
Number of purchases
Now let's try to collect information about the number of purchases. It is in the p tag with the class product-detail-page__purchased-text.
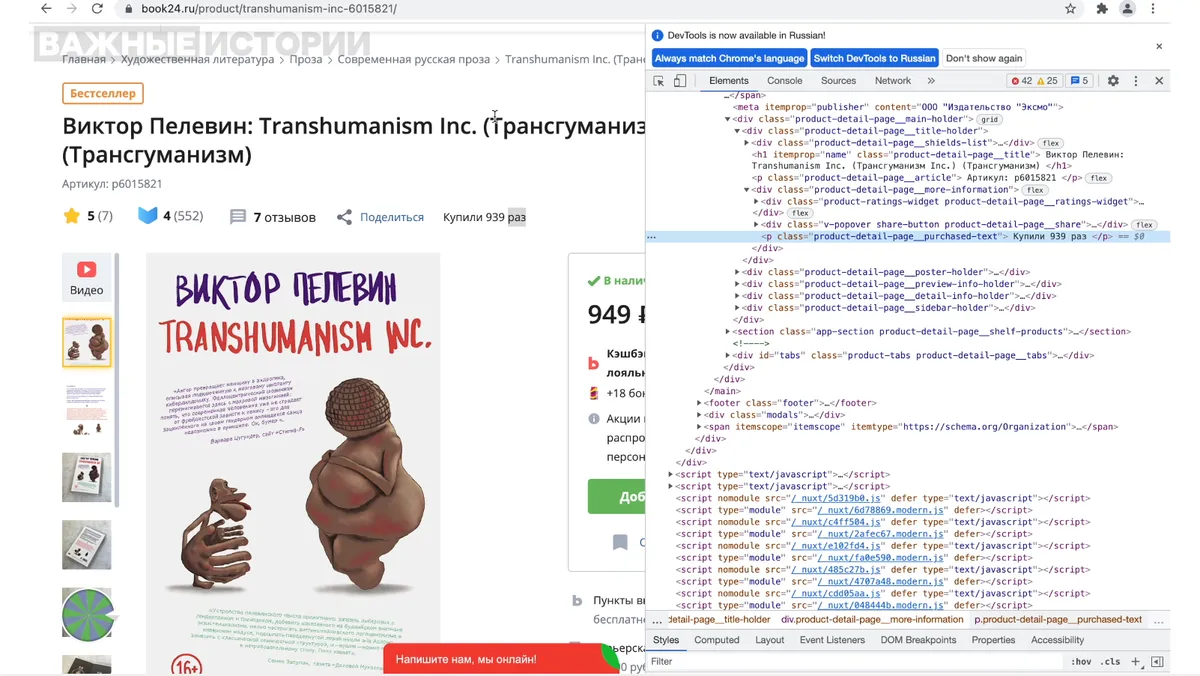
We return to the terminal. Again we write the response.css command, only now we insert the p tag and the desired class, immediately add text and get: response.css('p.product-detail-page__purchased-text::text').get()
We got the line: "Bought 939 times." But we want to extract only a number, for this we will use the split method already known to us. It splits the string by spaces and returns a list of words.
We need the first element in the list. Don't forget that in programming the countdown starts from zero: response.css('p.product-detail-page__purchased-text::text').get().split()[1]

We got the number we needed. Copy or remember this command, we will need it.
Section title
The third element that we will collect on the book page is information about the section. Again, right-click on the section name and select “view code”.

We can see that the section title is in the title attribute of the a tag, which is nested within the div tag. Let's copy the class of the div tag and return to the terminal.
Type the response command. Since the title was embedded in the attribute of tag a, after the class name we write tag a and after two colons the word attr and in parentheses the name of the attribute: response.css('div.product-characteristic__value a::attr(title)').

We received a list of elements as output. If we look at the site, we understand that these are different characteristics of the book, they are simply in the same tag.

The characteristic we need lies in the third tag. Since programming starts from zero, let's look at the second element of the list: response.css('div.product-characteristic__value a::attr(title)')[2].get().

We got the section name we need. Copy this command, we will need it later.
We write Spider
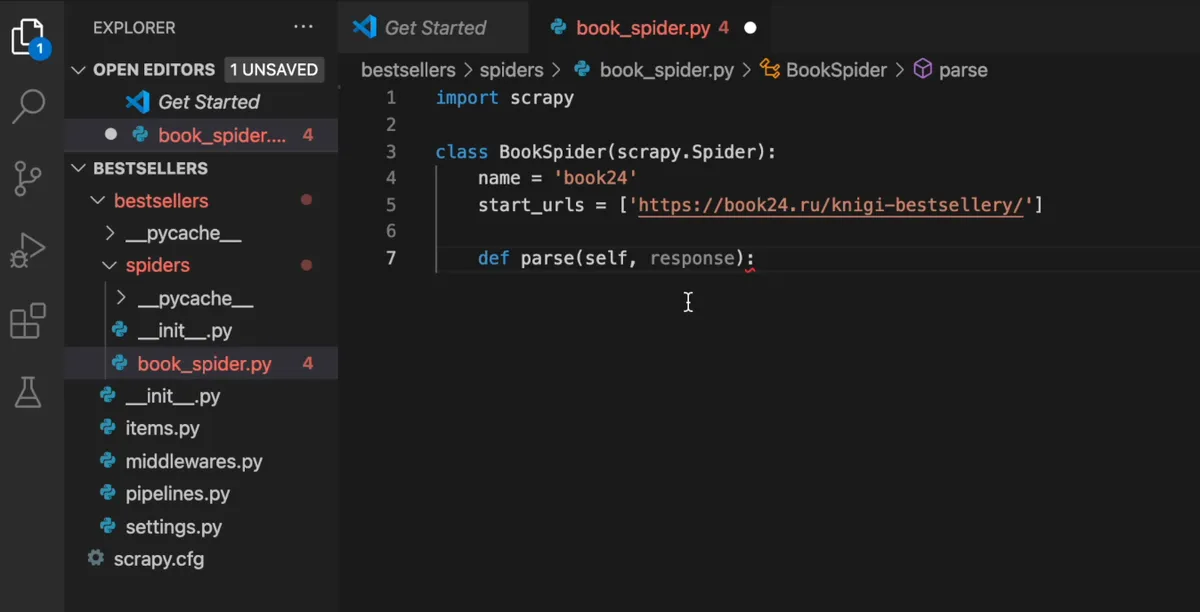
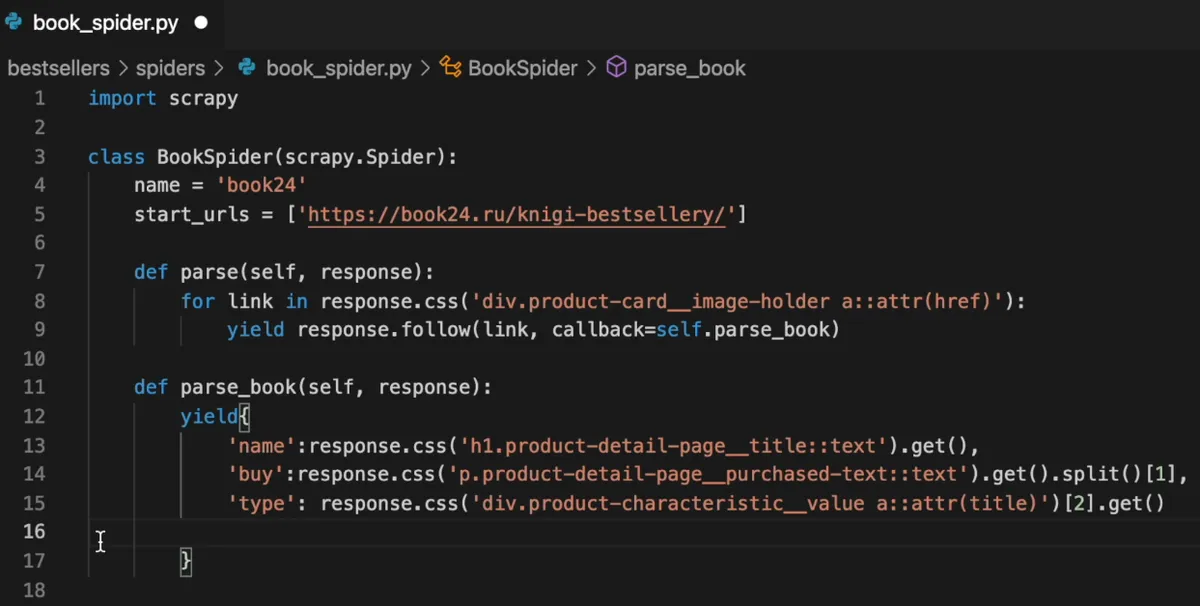
Now that we understand how to get the necessary elements, we can write our first spider. First, let's import scrapy: import scrapy.
In the scrapy library, each spider that collects information is a class. We need to create it.

Let's give the spider a name - book24. And the initial link from which to start the search. In our case, this is the bestsellers section.

We set scraping rules using the parse method. The standard notation for all Scrapy methods is: def parse(self, response):
We looked at how to take information from a book page, but first you need to get to this page. And to do this you need to collect links to each book. Let's see where they are. To do this, let's go back to the terminal and pass the fetch command a link to the bestsellers section.

Let's see where the link to the books page is. A link is an href attribute in an a tag that is nested within a div tag.
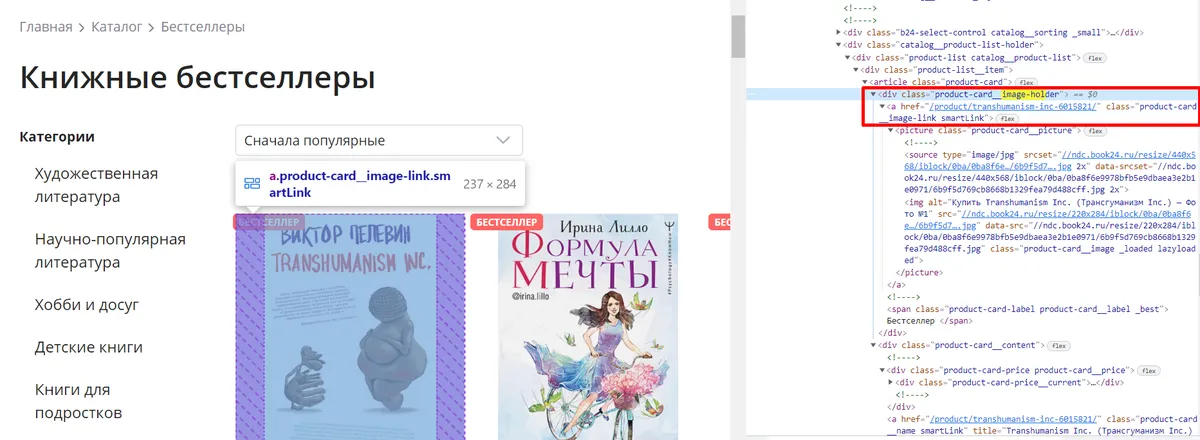
We can call it in the same way as we called the section title, only we specify the correct class name, and instead of the title attribute we write href: response.css('div.product-card__image-holder a::attr(href)').get().

We are writing a cycle to navigate through books
We need the spider to go through each link and enter it. To do this, let's write a loop. Let's say that we need to go through each link from our list. Here we no longer add get to the response.css command, because get outputs the first element from the list of css selectors, and we need links to all books.

To follow a link, we will use the follow method. We write yield, this is a keyword in Scrapy that allows you to perform various actions. Then we write response.follow and pass our link as an attribute. We’ll also write a callback - a rule by which the spider will understand what exactly needs to be done on the page to which it will go. If we don’t write a callback, the spider will simply follow the link and do nothing. We will pass the new parse_book method to the callback.

We collect information about each book
We write the parse.book method in the same way as we wrote the parse method before. In it we will specify what exactly needs to be collected on the page of each book. To do this, let's write the yield keyword again and create a dictionary. The keys in our dictionary will be the words: name, buy and type (book title, number of purchases, section name). And as values we will pass the commands that we called in the scrapy shell (remember, we advised you to copy them).
Navigate pages
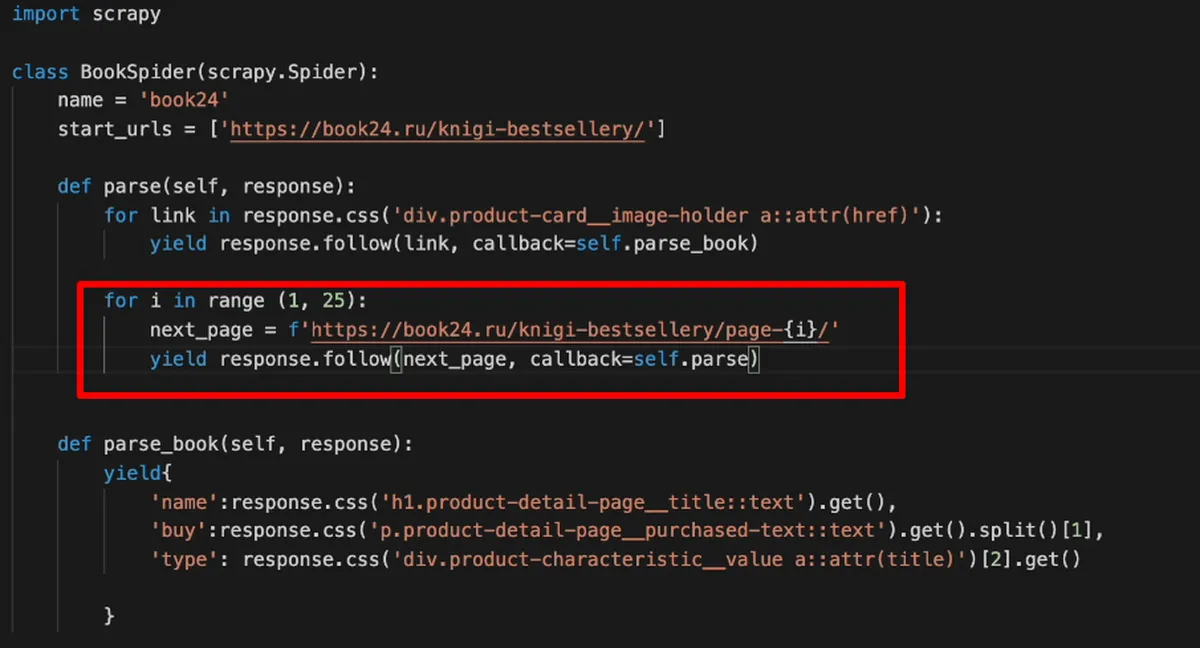
All we have to do is add a page transition. Since you need to move to a new page when all the information on the first page has been collected, we will add the transition code at the bottom of the parse method. We will proceed using the already known word yield and the response.follow command. Only this time we will not follow the link inside the book, but follow the link to a new page.
We talked about how to get a link to the next page using f-strings in the first lesson on scraping.
In the callback we specify what needs to be done after the transition: go inside each book. We specified this task in the parse method, so we write callback=self.parse
Launch the spider and write the parsing result to a file
Now our spider is completely ready, all that remains is to launch it. First you need to exit the scrapy shell. On Mac there is a hotkey for this: control+d. If we are sure that we want to exit, we press y on the keyboard. Don't forget to save our spider.
We type the last scrapy crawl command in the terminal, passing the name of our parser - book24.
To write data to a file, add: -O book.csv. The spider will collect all the data into a file called book with a csv extension.

After this command, the spider began to walk through all the pages and collect information on each book on each page. We see that the book.сsv file has appeared in the folder with our project. We check: if the file contains all the information that we wanted to collect, then our spider worked correctly.

If something doesn’t work out for you, write to our Telegram chat , we’ll try to help.
Support thosewho is telling the truth! You can become our donor by making a one-time or monthly donation. We want to depend only on you - those who want to know the truth, those who are not afraid to be free. Help us tell you the Stories That Matter.Support Important Stories